If you have a degree or diploma in mechanical engineering. And looking for a job in the mechanical field. Then this article can help you with your interview preparation. In this article, we will discuss commonly asked interview questions and answers on mechanical design. Interview questions discussed here are from the engineering curriculum. If you are aware of mechanical engineering basics, You can answer these questions.
We suggest you also read this article on frequently asked technical interview questions on manufacturing.
Here are the commonly asked interview questions and answers on mechanical design.
What are engineering tolerance?
Engineering Tolerances are allowable variations from given dimensions. In other words, it is the total amount by which a given dimension may vary without affecting product function.
Tolerance (for hole) = Hole (MMC) – Hole (LMC)
Why are tolerance required in enginerring drawings?
The production of closely mating parts, without tolerances, is economically unfeasible. This will increase the rejection rate and manufacturing cost. Therefore, tolerances are used with part dimensions to facilitate manufacturer and reduce cost.
Refer to this article for more details on engineering tolerance.
What is tolerance Stackup Analysis?
Tolerance stackup analysis is a design tool used to analyze and optimize product assembly. It calculates the cumulative effects of part tolerances in an assembly.
Read this article for more details on tolerance stackup analysis.
What are different types of tolerance?
- Unilateral Tolerance
- Bilateral Tolerance
What do you understand by fit?
The term fit refers to the permissible clearances between mating parts. The clearance between mating parts determines the type of Fit.
What are the different types of fits?
- Clearance Fit
- Interference Fit
- Transition Fit
What do you understand by Engineering Drawing?
Engineering drawing is a technical document used to transfer technical information and define requirements. In other words, it’s a graphical language that communicates ideas and information from one mind to another.
What is Section, Projection, Isometric & Detailed View?
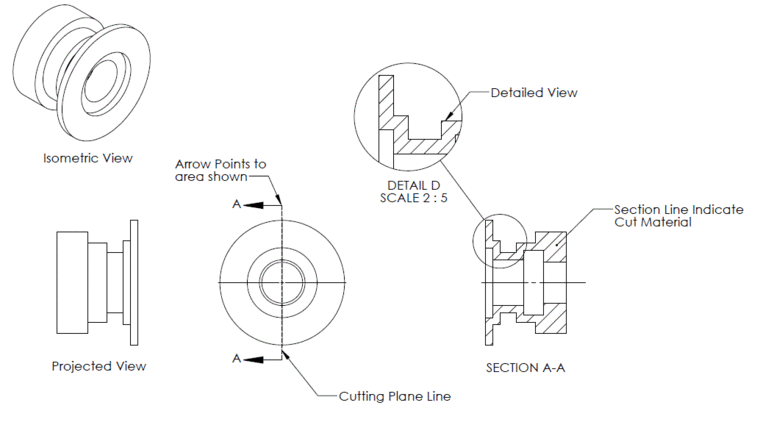
- Projection View: The projection view represents a 3-dimensional objects in 2-dimensions while looking from one side.
- Section View: It is used to show the interior construction of a part in an engineering drawing.
- Isometric View: Isometric projection represents 3D objects into 2D in engineering drawings. In this three coordinate axes appear equally foreshortened and the angle between any two axes is 120 degrees.
- Detailed View: It represents the larger view of any section of engineering drawing.
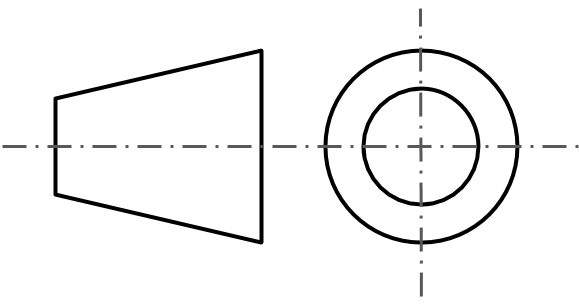
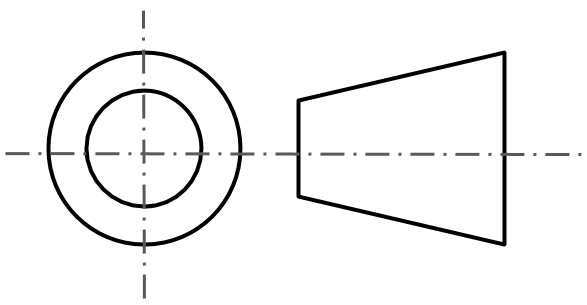
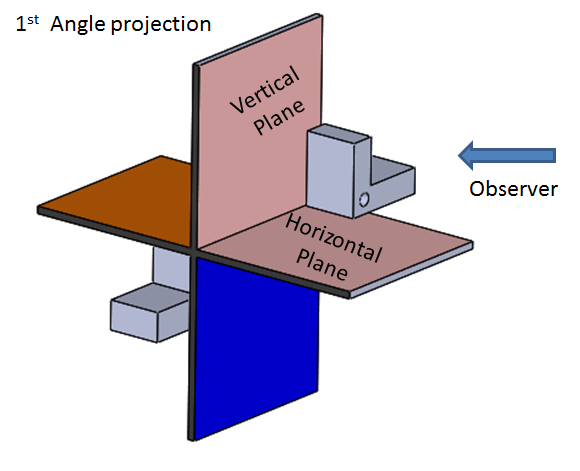
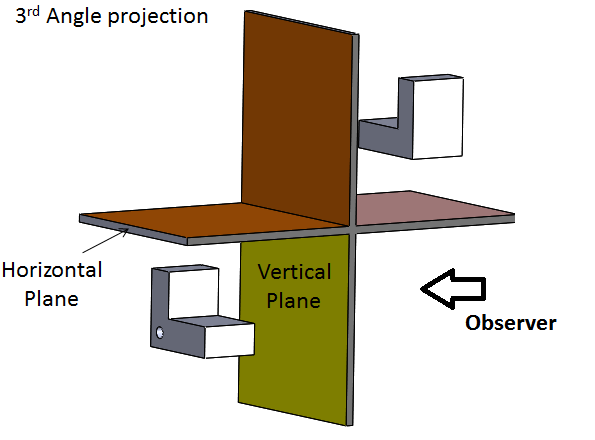
What is the symbol of 1st and 3rd angle projection?
Which projections are preferred for engineering drawings?
Following two types of projections are used :
- First Angle Projection
- Third Angle projection
Why 2nd and 4th angle projections are not used?
Because of the overlapping of front and top views, 2nd and 4th angle projections are not used.
What is the least count and how it is calculated?
It is the smallest value measured with the measuring instrument. For example, the least count for a normal scale is 1 mm whereas for a vernier scale it is 0.01 mm. Read this article for more details on Least Count.
Least Count= Value of one main scale Division – Total Number of Vernier scale division
What is the least count for Vernier Scale, Micrometer, and normal scale?
- Vernier Caliper Least Count = 0.01 mm (Digital) , 0.02 mm (manual)
- Micrometer Least Count = 0.01 mm
- Normal scale Least Count = 1 mm
What is the factor of safety and how it is calculated?
FOS describes the load-carrying capacity of a system beyond the expected or actual loads. In other words, FOS represents: how much stronger the system is compared to the intended load.
![]()
FOS is calculated considering the design load maximum value. The value of FOS is always greater than one. Click this link for more details on factor of safety in engineering.
What are types of screws?
Here are the various types of screw available in the market:
According to the type of Screw Head
- Countersunk Screw
- Raised or oval head screw
- Pan Head Screw
- Flat Head Screw
- Flange Head Screw
According to Screw Drive Type
- Sloted
- Phillip
- Pozi Drive
- Torx Head
- Hex Socket
- Triangular head
- Security Head Socket
According to Screw Thread Type
- Machine Screw
- Thread Forming
- Thread Cutting Screw
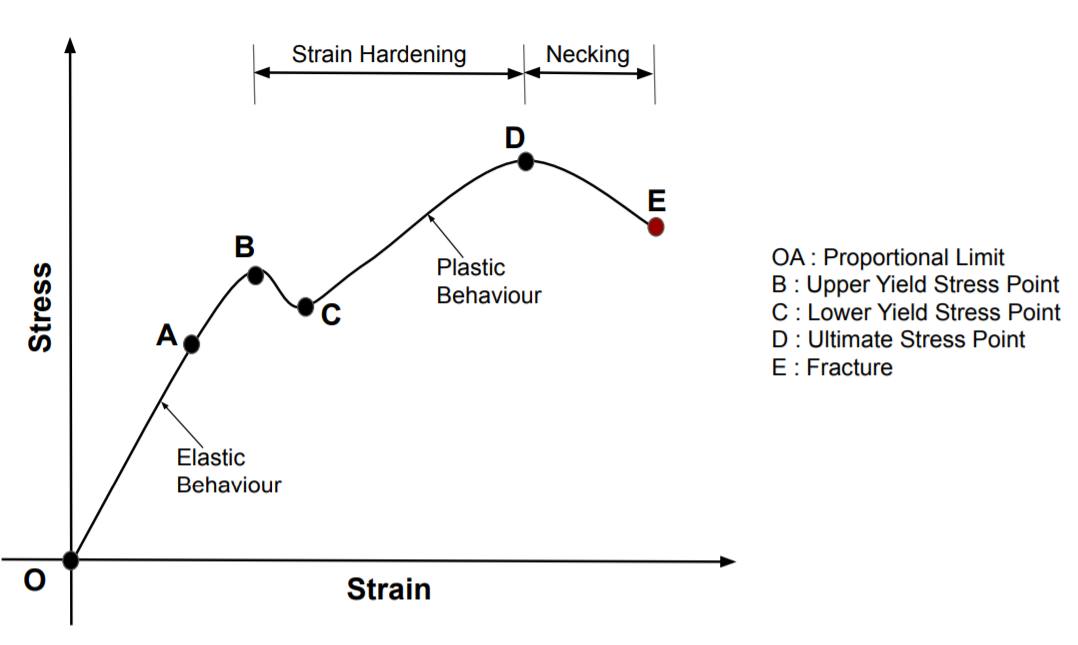
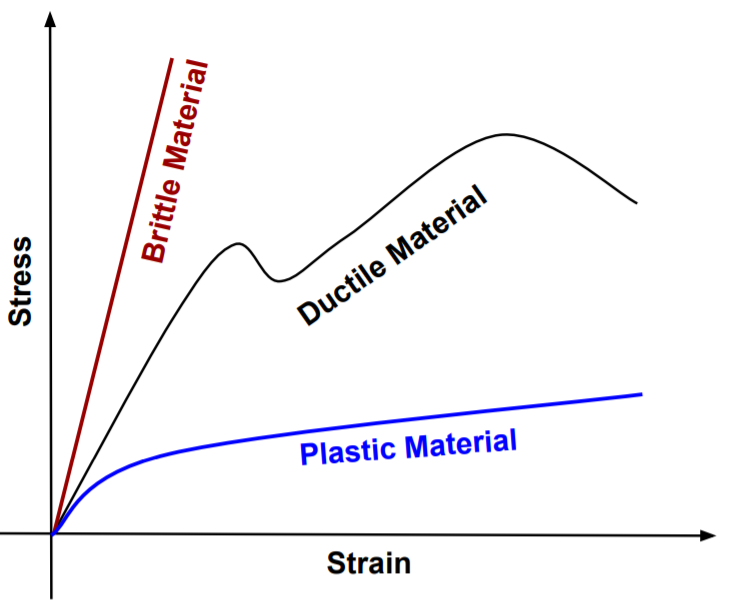
What is Stress-Strain Curve?
The Stress-Strain curve represents the behavior of material when an external force is applied to it. This diagram is used by product design engineers during material selection and structure design calculations.
Refer to this article for more details on the stress-strain curve.
What is a datum plane?
A datum is a theoretical exact plane, axis, or point location that GD&T or dimensional tolerances are referenced to.
What is GD&T (Geometric Dimension & Tolerance)?
GD&T is a system for defining engineering tolerances. It helps in conveying product assembly requirements to manufacturers. Read this article to know the basics of GD&T.
We will keep adding more questions to the mechanical design Interview questions and answers. Please add your comments or questions to mechanical design Interview questions and answers.
Important Links For Mechanical Design Interview
You can take following quiz to test your knowledge in different field. it will help you in building confidence in these fields.

Hello , I have one small doubt ,
That is If we need to design a cylinder accurately 1 or 2 litre capacity , We can use Cylinder volume formula and can find out the cylinder dimensions..and we can design accurately the cylinder which holds 1 litre..
My doubt is If we want design same 1 litre capacity in complicated structure like our modern water bottles..How we can calculate the exact dimensions ??
Hello surya they make water bottle at any design but filling water quantity is 1 liter only.
Dear surya, while designing bottles we first design it’s complicated shape, then we do particularly differentiation of shape, then we add volume of each & every shape, cumulation of all dimensions then we manufacture.
Please change that first angle and third angle projection symbols. It should be in reverse order.
Hi Soel, Thanks for your observation let me check this in details i thik this is correct
I don’t think there is any mistake in the projection angles. Please correct me if I’m wrong.
Change symbol of 1st and 3rd angle projection
projections symbols should interchange
Symbols are Updated..
Just replacing is not correct.