Second and fourth angle projection systems are not used to draw engineering drawings because of the limitation of overlapping projection views. In this article, we will discuss in detail the limitations of the 2nd and 4th angle projection systems.
To understand why 2nd and 4th angle projection are not used? Firstly we need to understand the concept behind the orthographic projection system.
How Orthographic Projection System Works?
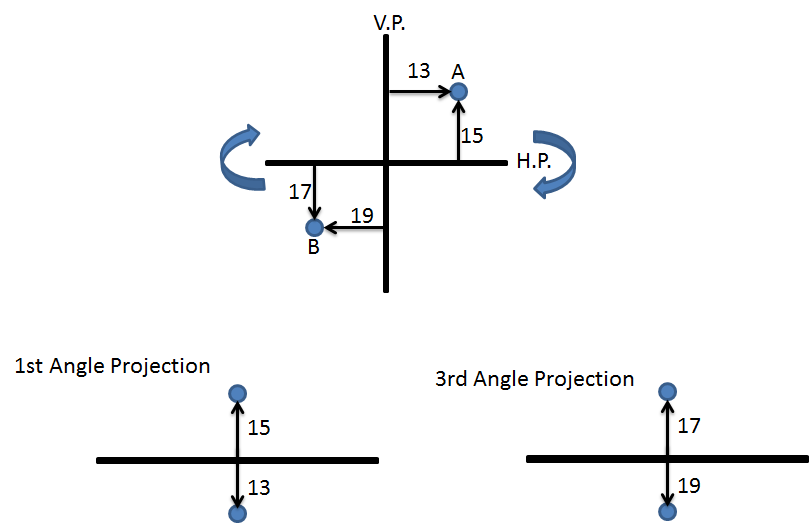
Let’s consider a point in A and B in the 1st and 3rd quadrant respectively. As per the rule of orthographic projection, to bring drawing views from three-dimensional to two-dimensional planes. The horizontal plane (HP) is rotated in the clockwise direction.

As shown in the above image, Point A in the 1st quadrant lies in between the observer and projection plane. Therefore the front view of point A will be in the vertical plane (V.P.) and the top view will be on the horizontal plane. Similarly, Point B in the 3rd quadrant can be projected on the horizontal and vertical plane.
Why Second and Fourth angle Projection Systems are not used ?
To understand why the 2nd and 4th angle orthographic projection systems are not used to draw engineering drawings. We will repeat the above experiment of creating engineering drawing views in the second and fourth quadrants.
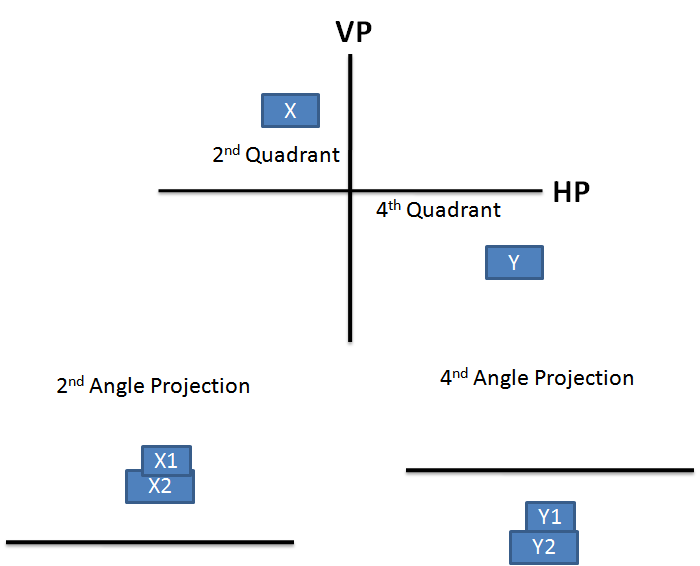
Let’s consider rectangular parts X and Y are placed in the 2nd and 4th quadrant respectively.
In the second quadrant, the vertical plane (VP) lies in between object X and the observer. Therefore the front view of object x will lie on the vertical plane whereas the top view will lie on a horizontal plane. As per the rule of projection when the horizontal plane is rotated 90 degrees in a clockwise direction, top and front views will overlap.

Overlapping projection views create confusion in the drawing. Therefore the 2nd angle projection system is not used to draw engineering drawings. Similarly when the object is placed in the 4th quadrant both the top and front view will overlap. Therefore fourth angle projection is also not used.
To sum up, Because of the overlapping of front and top views 2nd and 4th angle projections are not used. First and third angle projection systems are recommended for orthographic projections.
We will keep adding more information on why 2nd and 4th angle projection systems are not used to create engineering drawings. Please add your suggestions, comments, or questions on second and fourth angle projection systems in the comment box.

SIMPLE EXPLANATION NEED FOR DEMO TO STUDENT
i Need simple explanation for to expline our students
If you know the fundamentals of engineering drawing then explanation given above is sufficient for you to make your students understand.
Nope. I’ve studied architecture and have completed an apprenticeship in Joinery but we’ve not learnt second and fourth angle and the explanation diagrams above are impenetrable. It may be enough for you but not everyone.
The images provided are not educative enough. I would suggest that you clearly show the location of the plan, first and end elevation
Thanks For your valuable feedback. We will try to make it more informative