Tolerance Stackup analysis is a design tool used to analyse and optimize product design for assembly. It is used to calculate the cumulative effects of part tolerances in an assembly. Therefore tolerance stackup analysis ensures smooth part assembly on the production floor. In this article, we will discuss the worst case and RSS methods to solve tolerance stack up problems.
For a good understanding of tolerance stack up. We suggest you first read this article on What are Limit, Fits, and Tolerance?
Why Tolerance Analysis is Required?
Production of closely mating parts without tolerances is economically unfeasible. Tight tolerances can result in an increased rejection rate and manufacturing cost. Whereas loose tolerances can affect product function. Therefore it is always recommended to define optimized tolerances. Part tolerance optimization increases the part tolerance band. It also helps in reducing part manufacturing costs.
Tolerance stackup analysis is used to calculate optimized part tolerances. It can be done manually or using stackup analysis software.
Types of Tolerance Stack up Analysis
Various tolerance stack up analysis methods are used to calculate optimized tolerance values. Each method has its own advantages, limitation, and application. Out of these Worst Case and Statistical Tolerance Analysis methods are more popular. Let’s discuss these methods in detail.
Worst Case Tolerance Analysis
Worst Case tolerance stackup analysis method utilizes simple arithmetic (addition and subtraction) operations to calculate optimized tolerances. In this method, all dimensions are assumed at the extreme limit. For low production volumes, worst case tolerance analysis is recommended.
Advantages of Worst-Case Stackup Analysis
- Worst Case Tolerance stackup analysis ensures 100% parts assembly on the production floor.
- Zero rejection rate.
Disadvantages of Worst Case Stackup Analysis
- Worst Case Tolerance Analysis requires very tight individual component tolerances. It increases overall manufacturing and inspection costs.
Worst Case Tolerance Stack up Analysis Example
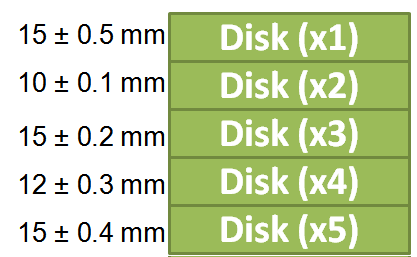
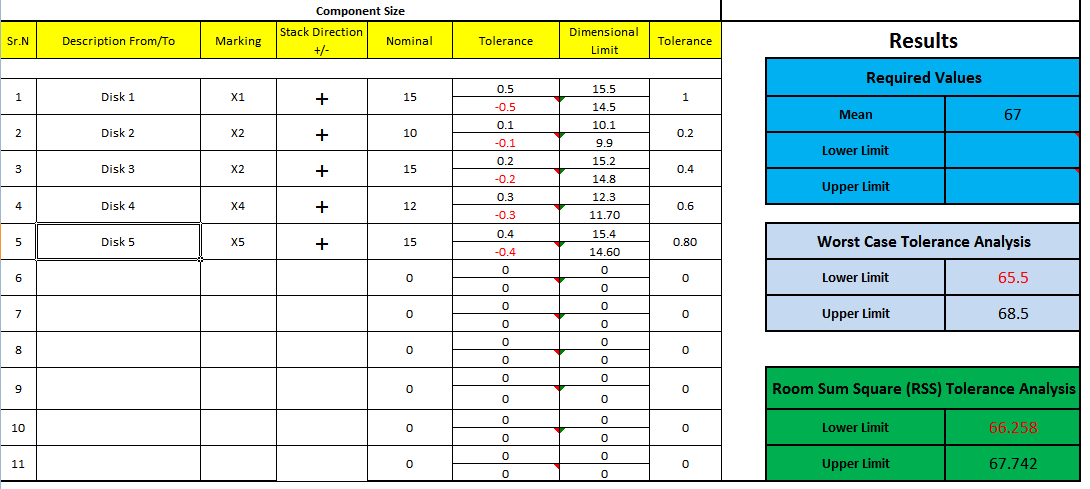
Let’s consider an example of five different size disks with different tolerances stacked on one another. We will calculate the overall maximum and minimum total stacked disk height using Worst Case Tolerance Stackup Analysis method.
Worst case tolerance analysis for a given problem can be done in the following steps:
Step-1 Create the Dimension Chain
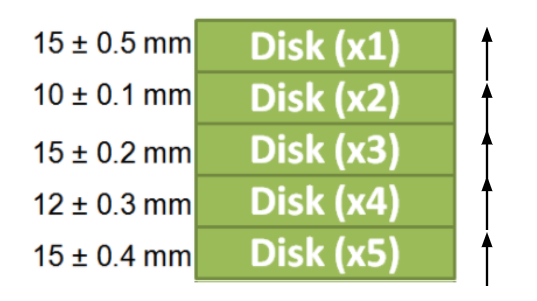
The first step in doing tolerance stackup analysis is to create the dimensional chain. It is used to determine the direction of tolerance. In the above example, all dimensions are in a positive direction.
Step-2 Calculate total nominal thickness
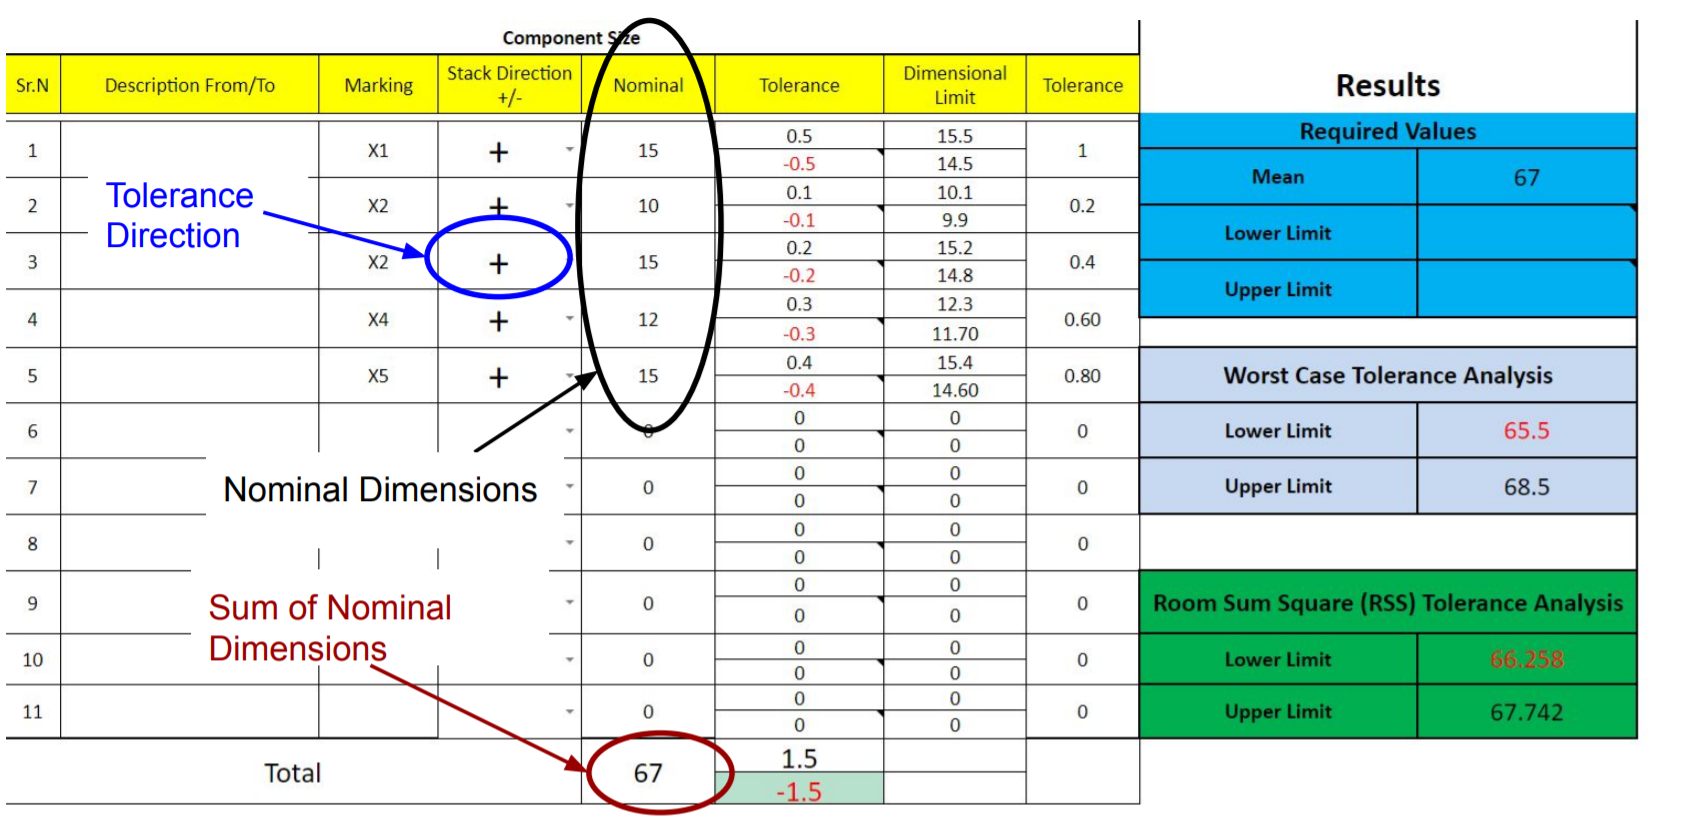
Total nominal disk thickness is calculated by adding the nominal thickness of all disks. Therefore
Total Nominal Thickness = (15+10+15+12+15) = 67 mm
Step-3 : Calculate total tolerance
Next step is the addition of total upper and lower tolerances.
Total Upper Tolerance = (0.5+0.1+0.2+0.3+0.4) = +1.5 mm
Total Lower Tolerance = (0.5+0.1+0.2+0.3+0.4) = -1.5 mm
Step-4 Upper and lower limit calculation
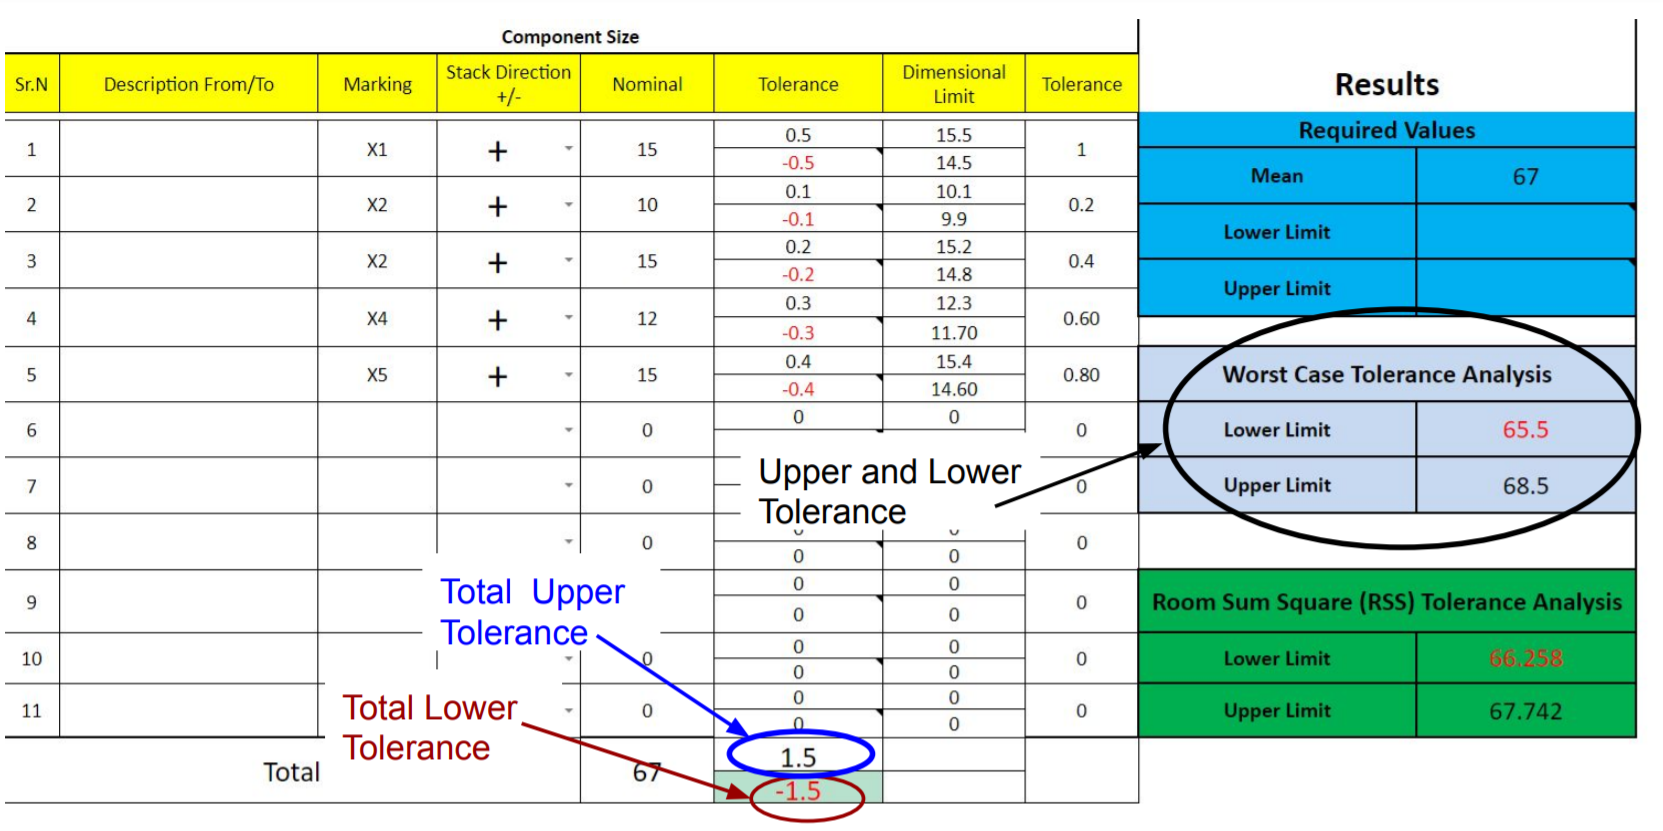
In this example, maximum and minimum disk stack-up height is calculated by adding nominal dimensions with upper and lower tolerance respectively.
Max. Height = Upper Limit = Nominal Dimension + Tolerance = 67 + 1.5 = 68.5 mm
Min. Height = Lower Limit = Nominal Dimension – Tolerance = 67 – 1.5 = 65.5 mm
Conclusion
In the above example, the total stacked disks height / thickness will vary from 65.5 mm to 68.5 mm. We suggest you also use this calculator to calculate total disk height using worst case tolerance analysis.
Statistical Tolerance Analysis
Statistical tolerance Analysis does not focus on the extreme dimensional limits. Because variation in manufactured part dimensions is not linear. Each dimension has a unique distribution based on the part manufacturing process, machines, and other parameters.
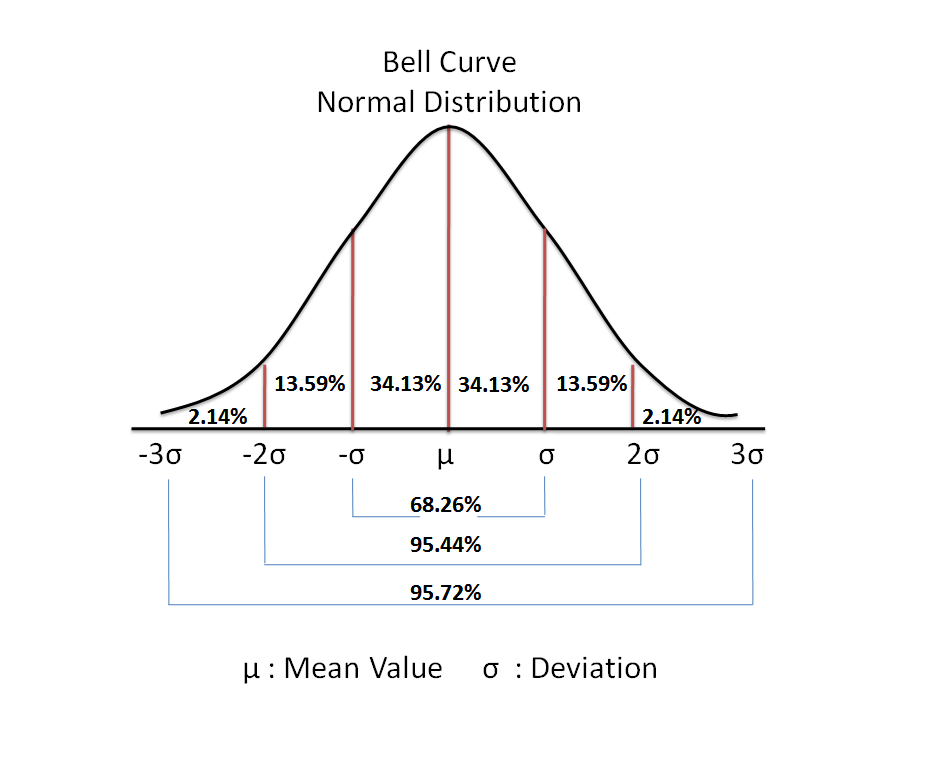
Statistical tolerance analysis is based on the Bell curve and normal distribution. For example, when a thousand disks of the same size are manufactured. Disk thickness will vary from upper limit to lower limit. But all disks will not measure the same because their thickness will be distributed.
Following two types of statistical tolerance, methods are widely used in the market.
- RSS Tolerance Stackup Analysis
- Monte-Carlo Simulation for Tolerance Stackup Analysis
In this article we will focus on RSS tolerance stackup analysis.
Advantages of Statistical Tolerance Analysis
- Statistical Tolerance stackup analysis helps in increasing component tolerance limits. In the worst case, part tolerances become very tight that increases part cost.
Disadvantages of Statistical Tolerance Analysis
- When parts are designed using statistical tolerance stack up analysis. Manufactured part dimensions can get out of limits and parts can get rejected. The number of rejected parts depends on part manufacturing capability (3σ, 4σ, 6σ)
- Statistical tolerance stackup analysis does not give a 100% guarantee for part assembly.
Root Sum of Squares (RSS) Tolerance Stackup Analysis Example:
Root sum square (RSS) tolerance stack up analysis works on a statistical approach. It is assumed that most of the parts fall to the middle of the tolerance zone.
Let’s consider an example of five different size disks with different tolerances stacked on one another. We will calculate the overall maximum and minimum total stacked disk height using RSS Tolerance Stack up Analysis method. RSS tolerance stackup analysis for a given problem can be done in the following steps:
Assumptions
For this calculation we will consider the manufacturing process is 3σ capable and Cpk value is 1.
Step-1 Create the Dimension Chain

Similar to worst case tolerance analysis, the first step in RSS tolerance stackup analysis is to create the dimensional chain. It is used to determine the direction of tolerance. In the above example, all dimensions are in a positive direction.
Step-2 Calculate Total Nominal Thickness
Total nominal disk thickness is calculated similarly to done during worst case tolerance stackup analysis by adding the nominal thickness of all disks. Therefore
Total Nominal Thickness = (15+10+15+12+15) = 67 mm
Step-3 Calculate standard deviation for each tolerance
Standard deviation is calculated by considering manufacturing process is 3σ capable. Mathematically standard deviation is equal to two times of process capability because the process is distributed on both sides. Therefore standard deviation for 3σ process is given by:
Standard Deviation = Total Tolerance / (2 X 3)
σ1 = (0.5+0.5) / (2X3) = 0.166
σ2 = (0.1+0.1) / (2X3) = 0.033
σ3 = (0.2+0.2) / (2X3) = 0.066
σ4 = (0.3+0.3) / (2X3) = 0.1
σ5 = (0.4+0.4) / (2X3) = 0.133
Step-3 Calculate Standard deviation for Assembly
Standard deviation for assembly is equal to root of sum of squares of the individual dimension standard deviation.
σ (assembly) = √ [(σ1)² + (σ2)² + (σ3)² + (σ4)² + (σ5)²]
= √ [(0.166)² + (0.033)² + (0.066)² + (0.1)² + (0.133)²]
σ (assembly) = 0.2472
Step-4 Calculate total tolerance zone
Mathematically tolerance zone is equal to the multiple of required process capability and total standard deviation for the assembly. Lower the value of process capability, narrow will be the tolerance zone and higher will be the rejection.
Tolerance Zone (For required process Capability = 3σ) = σ (assembly) X 3 = 0.74162
Tolerance Zone (For required process Capability = 6σ) = σ (assembly) X 6 = 1.48324
Step-5 : Calculate Upper and lower Limit
In this example maximum and minimum disk stackup height is calculated by adding nominal dimension with upper and lower tolerance respectively considering required process capability value is 3σ.
Max. Height = Upper Limit = Nominal Dimension + Tolerance = 67 + 0.74162 = 67.74162 mm
Min. Height = Lower Limit = Nominal Dimension – Tolerance = 67 – 0.74162 = 66.2584 mm
Conclusion
In the above example, the total stacked disk height/thickness will vary from 66.258 mm to 67.74 mm. We suggest you also use this calculator to calculate total disk height using worst case tolerance analysis.
How worst case and RSS tolerance Analysis Results are Different?
According to the worst case tolerance stack up analysis disk stack height can vary from 65.5 mm to 68.5 mm. Whereas according to the RSS method disk height can vary from 66.2584 mm to 67.74162 mm.
If you look at the results from Worst case and RSS method. In the RSS method, the tolerance band is reduced. Therefore designers can give more flexibility to manufacturers.
Tolerance Stack-up Calculator
You can also use our worst-case and RSS method tolerance stack-up calculator for tolerance stack-up calculations. You can Download Tolerance stack-up calculation sheet here.
To sum up, Tolerance stackup analysis is a very important part of product design. It also helps in reducing part cost. Various tolerance stackup analysis methods are available.
Got Questions? We will be happy to help.
If you think we missed Something? You can add to this article by sending a message in the comment box. We will do our best to add it to this post.


Informative log
Clears my all confusions of tolarrlence stack up analysis…
Language used is very easy to understand and satal.
I don’t understand the RSS scaling of the total tolerance band by 1/(2×3) to get the total standard deviation. If we assume the errors are uniform distributed – the standard deviation should = tolerance band/sqrt(12) = tolerance band/3.46. This is close to the factor of 3 used – but I don’t see where the additional factor of 2 comes in….
Hi Tony, Thanks for raising concern that topic is not clarifying all doubts. I will add more details ASAS.
Here is the answer for your question:
Standard deviation = (Upper Limit-Lower Limit)/6 = total tolerance/6
in above formula denominator (6) defines the distribution of dimensions. Denominator “6” indicates process is 3σ capable with cpk value equal to 1. If your manufacturing process is 6σ capable value ‘6’ need to be changes to 12.
I hope this answers your question
Sir,
Can you help in calculate pin diameter and their distance tolerance for manufacturing tolerance for gauge design ? Assuming three holes are diameter 10+/- 0.1,diameter 15+/- 0.2 and diameter 25+/-.1 these holes distance is 120+/-1,100+/-0.5 and 80+/-1.5 respectively.
Please share with formula to my Email
Can you provide a presentation or resources to guide in creating tol stack analysis stack diagrams, to include any assembly of 3 or more parts with a fixed fastener screw rectangular pattern? Simple disc stackup is clear but I am not clear how to handle more difficult aforementioned multipart ‘fixed fastener’ assy stack up.
Sure, I will update this article. If you go any specific problem Please share it, we will try to solve it.
In your bell curve normal distribution curve there is an error – for 6 sigma, instead of 99.72% you have marked 95.72%, and as a newbie I spent 20 minutes to re-affirm that… just wanted to let you know. Thanks for this article and calculator, it’s really helpful!
In RSS, the tolerace band is reduced. How it will help the supplier to produce parts. reduced tolerance band is the constraint for supplier, right?
In RSS tolerance band is not reduced, you actually allow some rejection compared to worst case tolerance. And the advantage of this allowable rejection can be given to supplier in term of tolerance.
Allowable of rejection will lead to cost , then it will be loss for suppliers?
Yes; It wont help machining supplier ; However this may help to casting supplier in case wall thickness calculation. If there is a defect on casting surface and it could lead to reduction in wall thickness. Due to RSS method machining tolerance will be reduced and in result increase in wall thickness.
is it right? the 95.72% in the normal distribution diagram.
Nice writeup. Please note that there is a typo for the 3 sigma area under the curve of the normal distribution bell curve. It should read 99.72% rather than 95.72%. Regards.
Hi,
I like using your stack up calculator spread sheet. Can you share the password so I can name my project?
Thanks
Sean
Can we use the sampling theory approach for the above statement for small batch of samples.
I do not have much knowledge of the sampling theory approach. But my understanding is we can use it since it is based on statics only.
How should we deal with uneven tolerances (e.g. +0.1/-0.3)? Do we “normalize” it to +0.2/-0.2 (& adjust the nominal value accordingly)?
Can you please share the RSS Formula Derivation.
Please provide an example with negative stack direction.
You mentioned in your calculation the direction of the stack. if you have a 6th step, lets say an etching step, that removed a portion of the last disk, would you include the statistical tolerance calculation of that 6th subtractive step into the same way you did for the RSS of the first 5? or would you RSS the 5 additive steps and then get a tolerance analysis done, followed by an RSS of the 5 steps with the subtractive step?
As you said, Mathematically standard deviation is equal to two times of process capability because the process is distributed on both sides.
based on above, for ‘3 sigma’ the total tolerance of each dimension is divide by 6 (i.e. 2×3) to calculate standard deviation.
but at the time of total tolerance zone calculation ‘sigma assembly’ multiplied by only 3 for ‘3 sigma’ capacity.
my concern is, just like at the time of total tolerance calculation we divide each total dimension tolerance value by 6. like wise we need to multiply by 6 to ‘sigma assembly’ to get total tolerance zone. because process is distributed on both sides of mean value.
please provide your feedback.
Is the stack up template file open source? There are few sections I cannot use.
How do you calculate if an element in the stack-up has unbalanced tolerance? For example X +0.5/-0.1 or X +1/-0? Do you shift the “nominal” and then balance the tolerance, or is there a more accurate way to calculate the final tolerance stackup?
Amazing, very good work. I learned a lot from this.
One question is troubling me. “Standard deviation is calculated by considering manufacturing process is 3 sigma capable.” -> Std deviation = total tolerance/ (2×3). This one I understand.
If I calculate the total deviation (not std deviation) I get 1.4832… that is +- 0.74162 (the same as in your calculation).
My formula that I used: (0,5+0,5)^2+(0,1+0,1)^2 .. (0,4+0,4)^2)^-0,5 ~ 1.48324.
Why do we need to determine the process capability index in the first place? Is the answer that first we need to determine the manufacturing process capability (e.g. 3 sigma) – and second we need to determine the process capability for the assembly “event” (that can differ from 3 sigma)?
Because otherwise, if the there is only one and the same process capability value to be used after it’s chosen – there is no need the include it to the calculation. Or am I missing something?
Hello,
I have the same question asked by Nagaraju. So how does the worst case analysis has disadvantage over RSS method? Compared to Worst case, in RSS, you allow some parts rejection. But what about the cost of those rejected parts? How exactly RSS method is advantageous over worst case?
I’ve been told if there is a sequence of just 2 dimensions then RSS is not required. I can’t find where this rule originates. Can you confirm?
Your spreadsheet is incorrect.
For – 1.05 +0/-.01, the two values that are calculated are -1.06 and -1.05. The two values should be -1.05 and -1.04.
Thanks Edward for your feedback. This is a linear tolerance calculator, that simply works by adding the tolerance. Here -ve sign shows the tolerance direction. So ideally output shall be irrespective of sign. So i agree with you and we will improve on this point. But at the same time, i believe it has no impact on end results as this is calculated based on cumulative values. We recommend you to also check our online tolerance calculator where we tried to over come the limitations of excel: https://www.smlease.com/entries/product-design/online-tolerance-stackup-calculator/